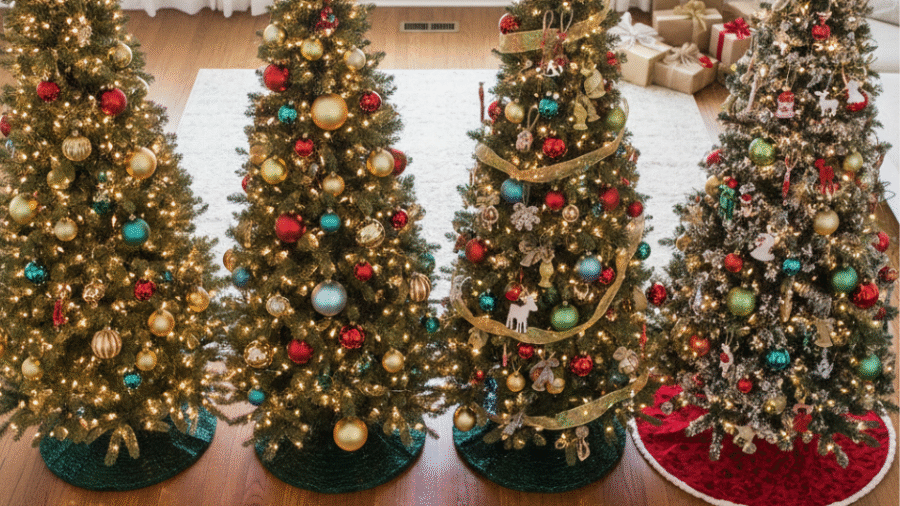
Decorating a Christmas tree is one of the most cherished holiday traditions around the world. With countless ornaments, twinkling lights, ribbons, garlands, and tree toppers to choose from, the process can sometimes feel overwhelming. Knowing the right order to decorate a Christmas tree makes the experience smoother, efficient, and yields a beautifully balanced tree that delights family and guests alike.
This article provides a practical, step-by-step guide on how to decorate a Christmas tree properly from start to finish. It covers the essential stages, tips, and finishing touches that pros use to create stunning holiday centerpieces.
Why the Order of Decorating Matters
Ordering your decorating tasks helps to:
-
Avoid moving around fragile decorations multiple times.
-
Maximize visual balance and fullness.
-
Ensure lights illuminate all layers properly.
-
Prevent overcrowding or uneven coverage.
-
Reduce frustration and save time.
Step 1: Fluff Your Tree
Before adding any decoration, fluff the branches—especially important if you have an artificial tree.
-
Remove the tree from its packaging.
-
Spread out each branch, pulling apart wired sub-branches to fill in gaps.
-
Move limbs in different directions to give the tree a fuller and more natural appearance.
-
Step back frequently to spot sparse areas and adjust accordingly.
Proper fluffing helps create volume and space to hang decorations beautifully.
Step 2: Add the Lights
Lights provide the magical glow that makes Christmas trees captivating.
-
Choose LED lights for safety and longevity.
-
Test all strands before stringing to ensure bulbs work.
-
Start at the base near the power outlet.
-
Weave lights deep into the branches and wrap around limbs in a spiral or zigzag pattern.
-
Alternate placing lights toward branch tips and near the trunk for depth.
-
Use about 100 lights per 1-1.5 feet of tree height as a guideline.
A well-lit tree is the foundation on which all other decorations shine.
Step 3: Drape Ribbon and Garland
Adding ribbon or garland next brings texture, color, and fullness.
-
Cut wired ribbon into long strips and tuck or weave into the tree.
-
Garland options include beads, tinsel, popcorn, or cranberry strings.
-
Arrange ribbon in loose spirals or cascading loops from top to bottom.
-
Combine different widths and textures for dimension.
-
Position ribbons and garlands evenly for balance.
Ribbons and garlands frame the tree and prepare it for ornament placement.
Step 4: Hang Larger Ornaments
Start decorating with your largest or most eye-catching ornaments.
-
Evenly space these statement pieces around the tree.
-
Place some deeper inside the branches to add layers.
-
Large ornaments near the bottom anchor the tree visually.
-
Avoid clustering heavy ornaments on fragile branches.
Starting with the big pieces helps anchor your theme.
Step 5: Add Medium and Small Ornaments
Fill in gaps and add detail with your medium and small ornaments.
-
Use a mixture of shapes, colors, and finishes (matte, shiny, glitter).
-
Distribute evenly to avoid overcrowding one section.
-
Hang lighter ornaments near branch tips.
-
Group ornaments in sets or color families for a cohesive look.
This step gradually builds depth and personality.
Step 6: Insert Picks, Sprays, and Floral Accents
Picks and sprays fill empty spaces and add natural flair.
-
Pinecones, faux berries, flowers, leaves, or glitter sprays work well.
-
Insert deeply for a three-dimensional look.
-
Use these accents to complement your color scheme and enhance fullness.
They provide finishing touches that professional decorators often use.
Step 7: Add Ribbon Accents and Bows (Optional)
Additional decorative ribbon bows or accents can add luxury and volume.
-
Use smaller wired bows positioned strategically.
-
Combine with larger ribbons for layered effect.
Step 8: Place the Tree Topper
No Christmas tree is complete without a tree topper.
-
Classic toppers include stars, angels, bows, snowflakes, or finials.
-
Ensure the topper complements the tree shape and size.
-
Secure it firmly at the apex using built-in holders or floral tape.
Tree toppers provide height and complete the visual story.
Step 9: Add a Tree Skirt or Collar
Finally, dress the base with a skirt or collar.
-
Tree skirts hide the stand and catch fallen needles.
-
Choose fabrics or styles coordinating with your Christmas theme.
-
Tree collars made of wood, metal, or woven materials provide modern alternatives.
The skirt or collar finishes the display and provides a gift platform.
Bonus Tips for a Professional Look
-
Select a theme or palette before decorating.
-
Use ornaments of varied sizes and textures.
-
Keep color balance throughout the tree.
-
Step back often to view from different angles.
-
Keep heavy ornaments on sturdy branches.
-
Avoid cluttering one side for symmetry.
Read More: Is a Christmas Tree a Religious Symbol? Exploring Its Meaning and Significance
Conclusion
Decorating a Christmas tree in the correct order—fluffing, lighting, adding ribbon, hanging ornaments from largest to smallest, and finishing with toppers and skirts—ensures a beautiful, balanced, and stress-free experience. Following these steps helps turn even the simplest tree into a stunning holiday centerpiece that fills homes with joy and festive spirit.
To explore more detailed guidance, inspiration, and product recommendations, visit Balsam Hill’s ultimate decorating guide: Christmas Tree Decorations: The Ultimate Guide | Balsam Hill .


Add a Comment